Quick Guide
Use this guide to get your app up and running.
Step 0: Activate the app
Select a plan to activate the app and and enable Store Locator functionality for your customers. The app is free for the development stores.
Step 1: Enable R+ Store Locator Helper
The app is working in themes where the R+ Store Locator Helper App Embed Extension has been enabled.
Note: The extension must be enabled separately for each theme you want to use it in. If you switch themes, remember to re-enable the embed.
To enable the extension:
- In your Shopify admin, go to Online Store → Themes.
- Find the theme you want to edit and click Edit theme.
- In the sidebar, click the App embeds icon.
-
Find R+ Store Locator Helper in the list and toggle it on.
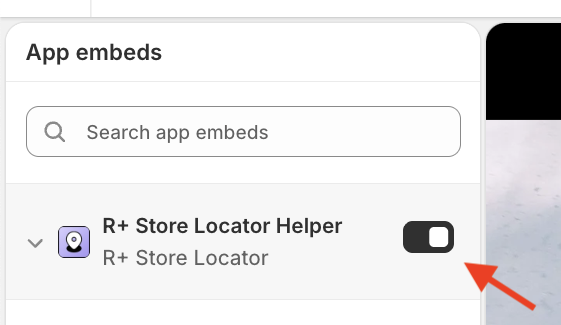
- Click Save.

Step 2: Set up the Google API key (optional)
To display a Google map in your Store Locator page, you’ll need to create a Google Maps API key and add it to your app settings. This guide walks you through the process step by step.
Once created, you’ll connect it to the Store Locator App so Google map will be displayed on your website.
You can check the full Google Maps API Key Setup Guide in this article.
-
Go to your Store Locator app, Map Provider tab
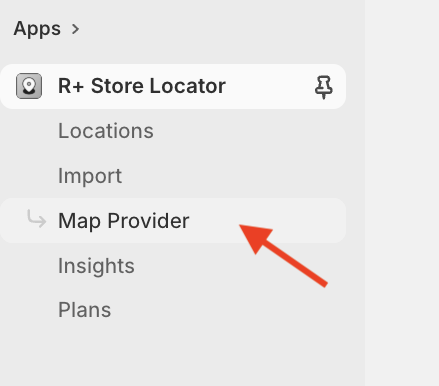
- Paste the key into the Google Maps API Key field
- Click Save map API Key


The app will attempt to automatically verify your key.
Step 3: Add your first location
Go to Locations page

Click Add Location to open a modal where you can enter details about your location.

Fields
| Field | Required | Description |
|---|---|---|
| Name | ✅ Required | Enter the name of your location. |
| Address line 1 | ✅ Required | Enter the street address and building number. |
| Address line 2 | ⬜ Optional | Apartment, suite, unit, etc. |
| City | ✅ Required | Enter the city. |
| Country | ✅ Required | Select the country from the dropdown. |
| Latitude & Longitude | ✅ Required | Auto-detected when the address is entered correctly — click the Detect button. If detection fails, enter coordinates manually using the manual guide. |
Shop Location
Connect Shopify native locations with your app's custom locations to display them in the Store Availability block.
How it works: By default, the Store Availability block shows only Shopify native locations, since they are directly connected to product inventory. After connecting locations, the block will display your custom location information while using stock data from the linked Shopify location. This allows customers to see accurate availability along with your custom location details.
Custom Pin
Change the appearance of location pins on the map by adding a custom pin. Enter the full image URL starting with https:// .
By default, the app uses its own map pins.
Custom Favourite Pin
Set a custom pin that will be displayed when customers add a location to their favourites, making it easier to spot on the map.
Open Hours
Display business hours for your location.
When you're done, click Save.
Step 4 : Add Store Locator block (Optional)
Before using the Store Locator functionality, you need to add the block to a page template and optionally configure its appearance.
You can read more about setting up your Store Locator in this article.
Add the Store Locator Block to a Page Template
- Go to Online Store → Themes, and click Customise on your active theme.
-
Open the page selector at the top, then go to Pages and press Create template.
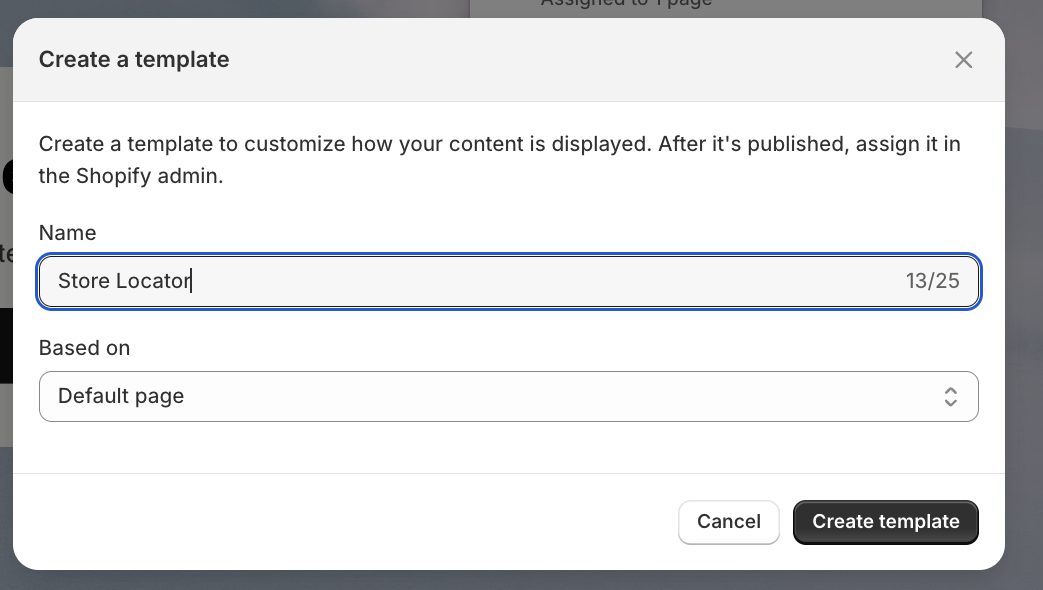
-
Enter the template name (for example, Store Locator) and click Create template.


Next, create a page using this template:
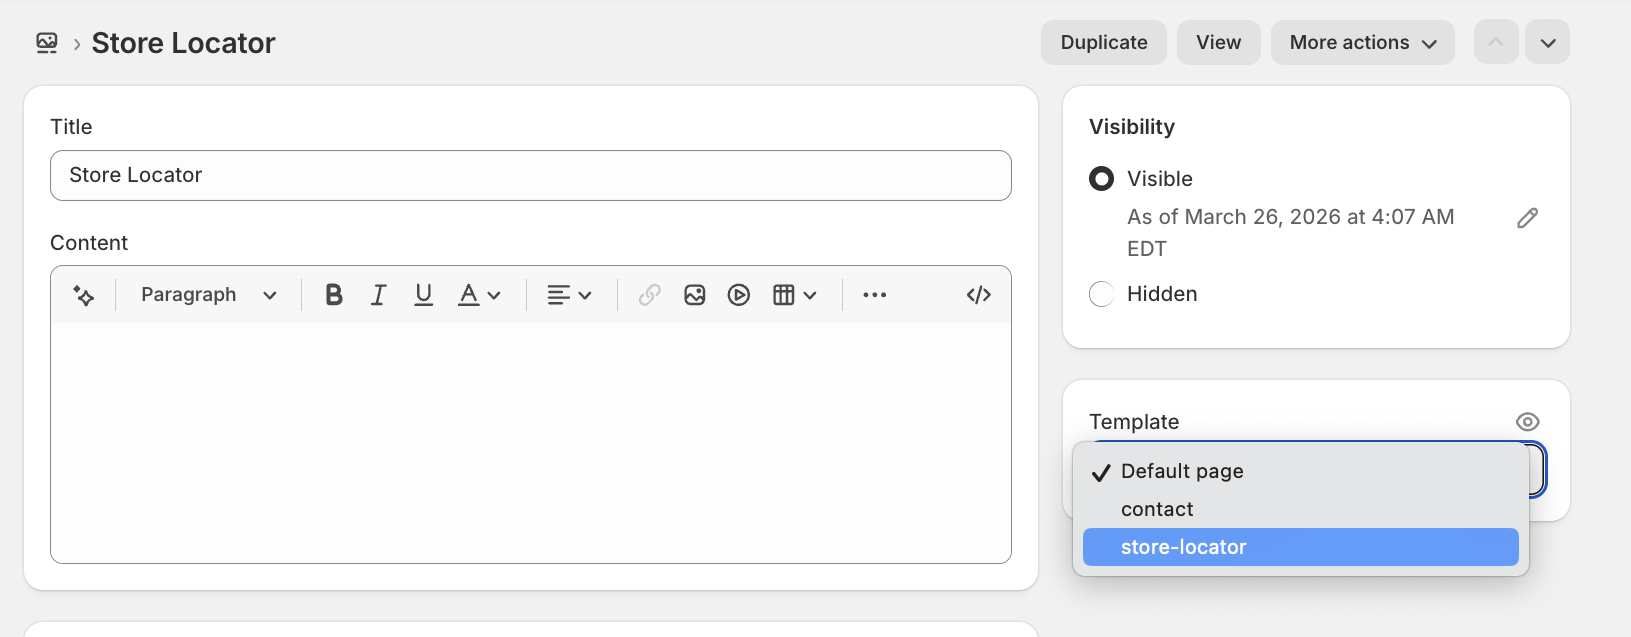
- Go to Online Store → Pages and click Add page in the top-right corner.
- Enter the page name (for example, Store Locator).
- Set the page visibility to Visible.
- Choose the store-locator template you created earlier.
-
Click Save.

Now add the Store Locator block:
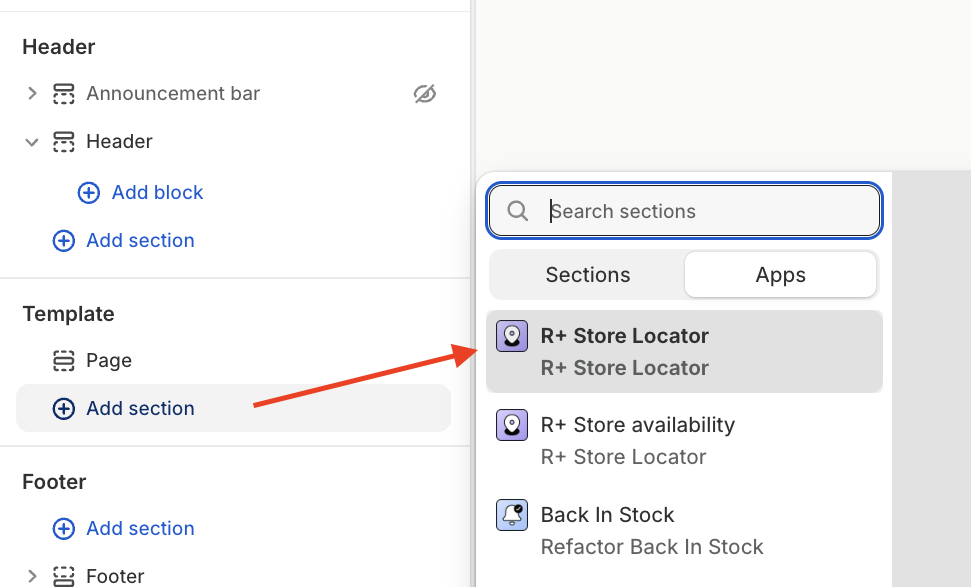
- Go back to Online Store → Themes, and click Customise.
- Open the page selector and choose your Store Locator page.
- Click Add section and select R+ Store Locator.
-
Click Save.

Step 5 : Add Store Availability block (Optional)
Before using the Store Availability functionality, you need to add the block to your product page and optionally configure its appearance.
You can read more about setting up your Store Locator in this article.
Add the Store Availability block to your PDP
- Go to Online Store → Themes, and click Customise on your active theme.
- Open the page selector at the top, then go to Products and choose your Product template.

- On the Product page, open the Main product section (for example, Product Information).
- Click Add block.
- In the modal window, open the Apps section and select R+ Store Availability.

- Choose the desired position of the block (above or below other blocks).
- Click Save to apply your changes.
Do you need help?
If you have any questions or run into issues, please contact us — we’re happy to help.