
Adding and Customizing the Notify Me Button on the Product Page
Overview
The R+ Back In Stock block lets customers sign up to receive an email notification when an out-of-stock product variant becomes available again. The block appears automatically on product pages and activates itself when a selected variant is unavailable. Once a customer submits their email, they're added to a waitlist and notified when stock is restored.
How It Works
When a product variant is out of stock, the block becomes visible and shows a "Notify me" button. Clicking the button opens a modal popup where the customer enters their email address. After submitting, a confirmation message is displayed and the button label updates to reflect the subscription. If the customer switches to a different variant, the block checks whether they're already subscribed to that specific variant and updates its state accordingly.
Logged-in customers benefit from automatic email prefill and personalized subscription tracking — the block can detect if they're already on the waitlist and display a different message instead of the standard button.
Adding the Notify Me Button (as App Block)
-
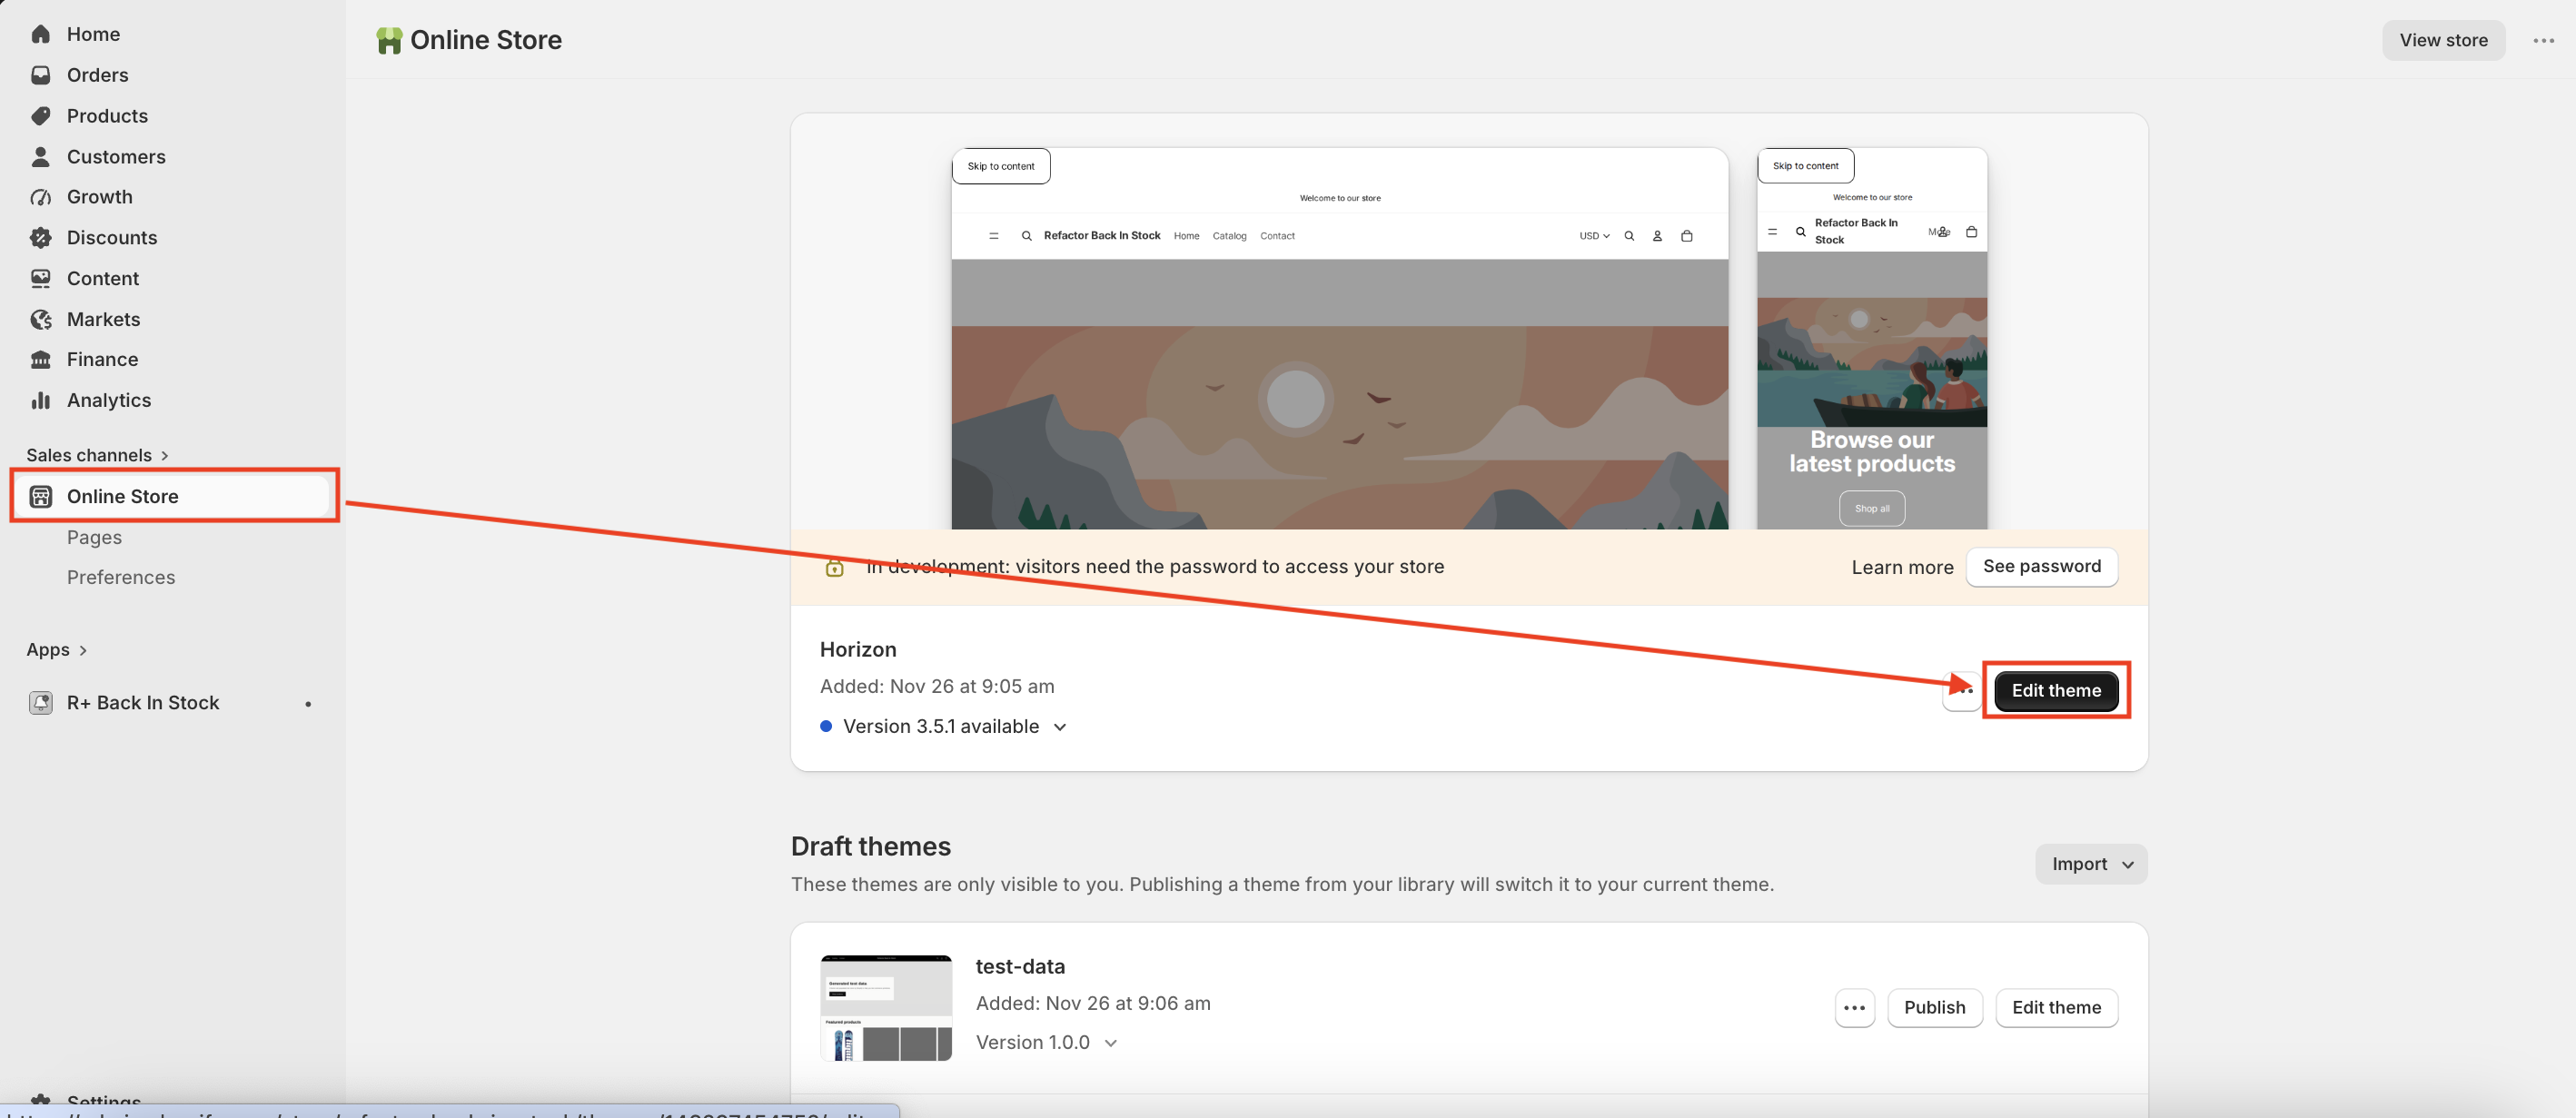
Go to Online Store → Themes, and click Edit theme on your active theme.
-
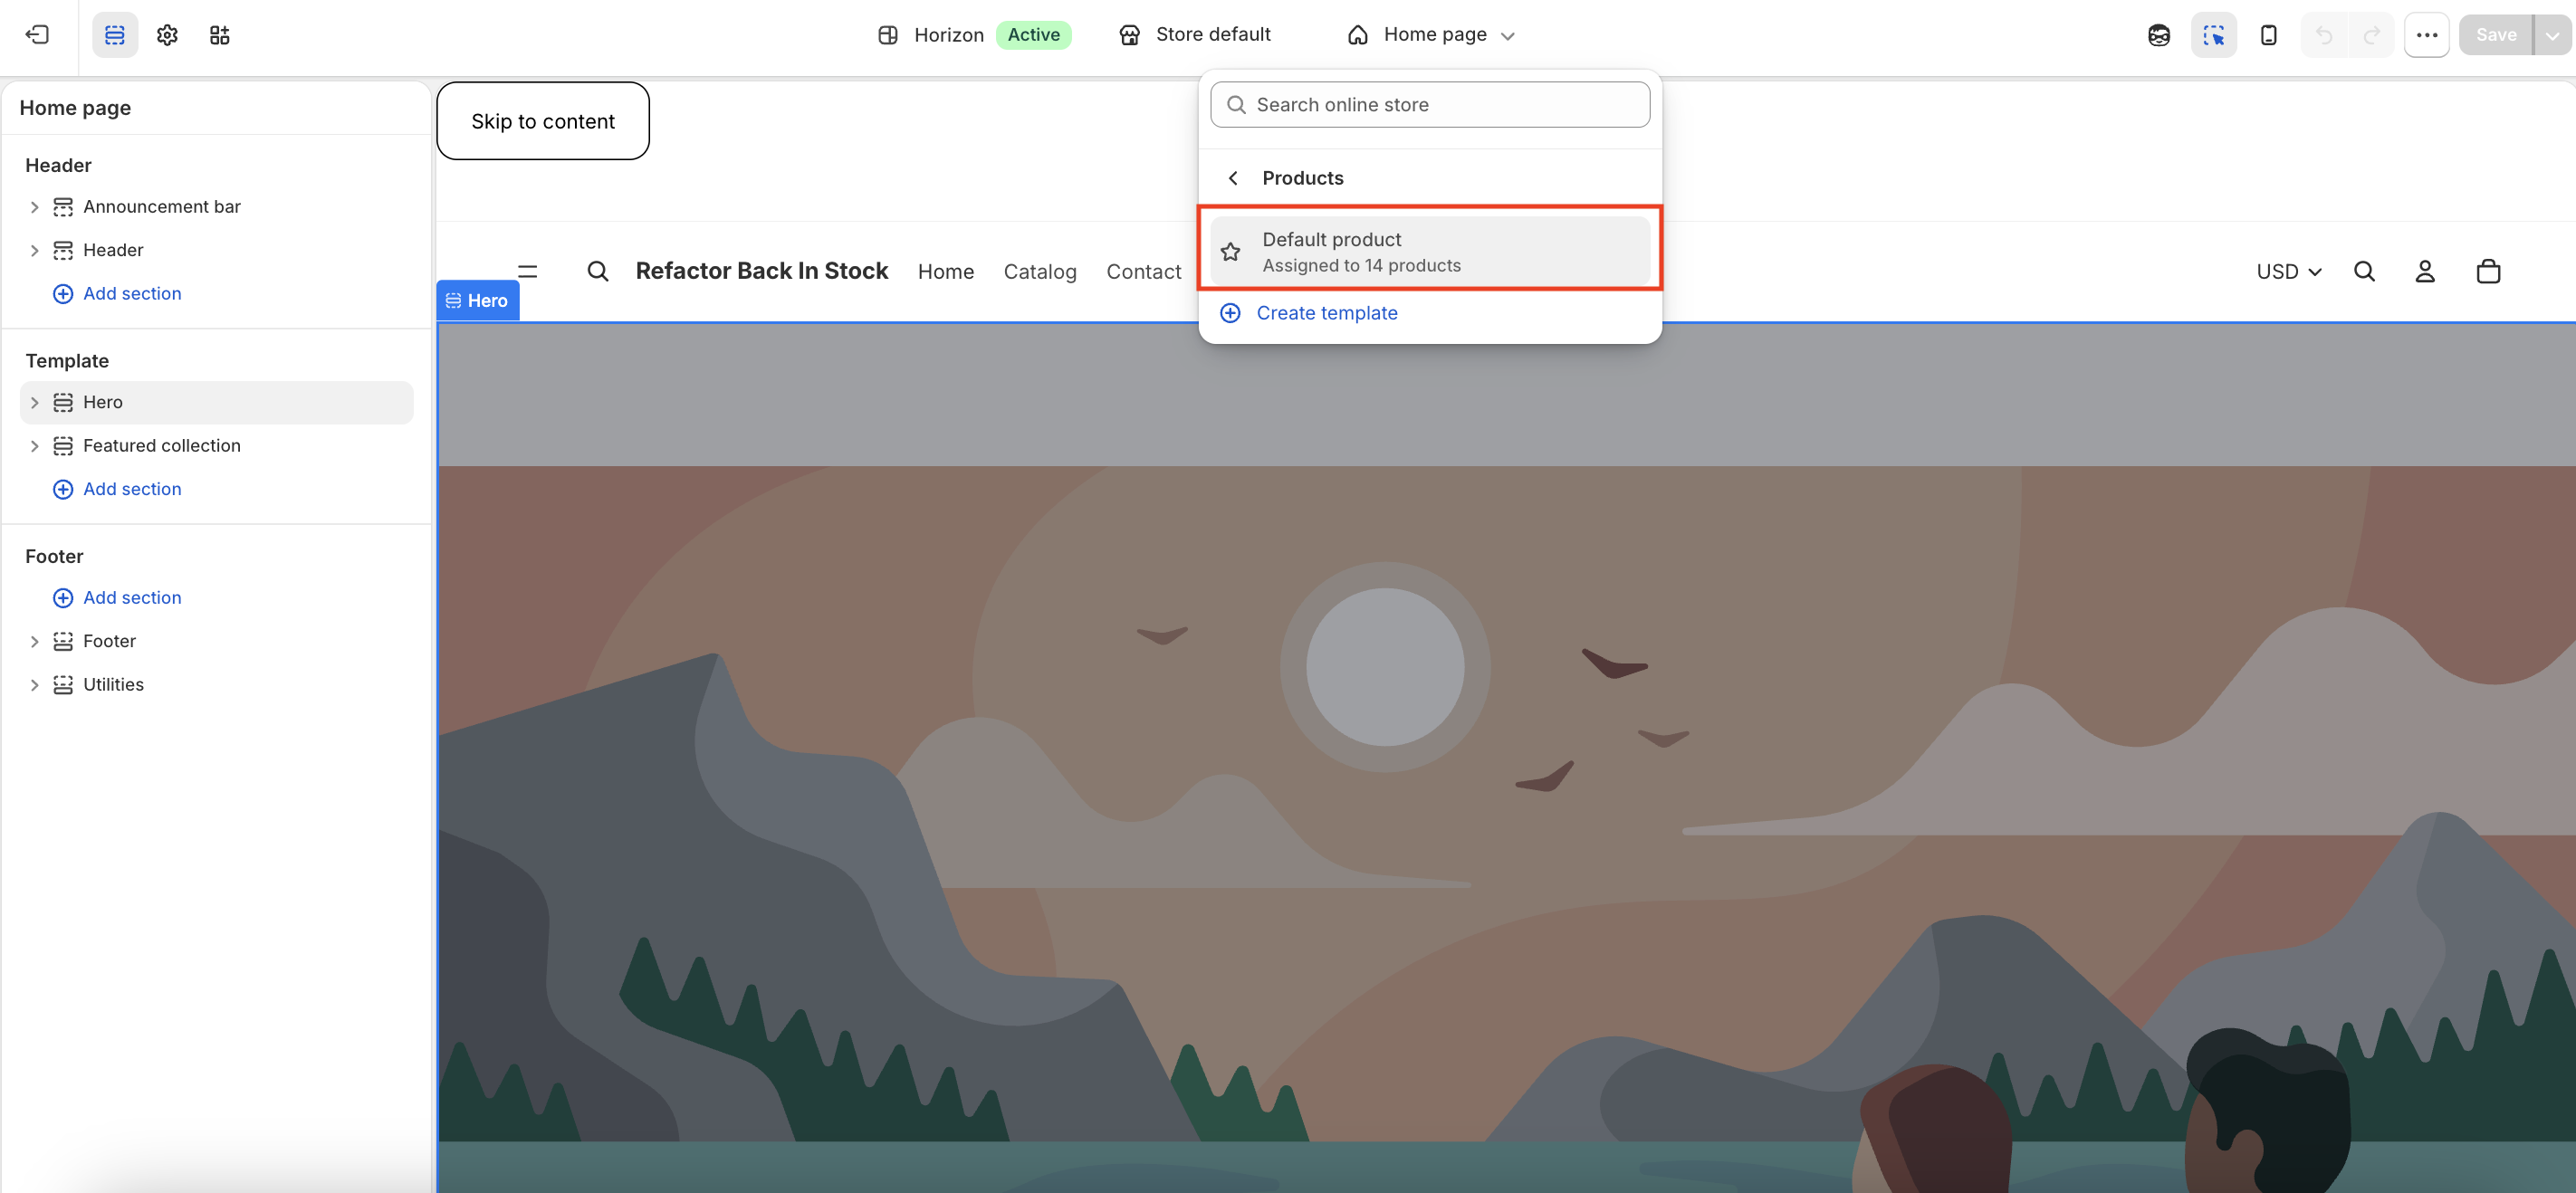
Open the page selector at the top, then go to Products and choose your Product template.
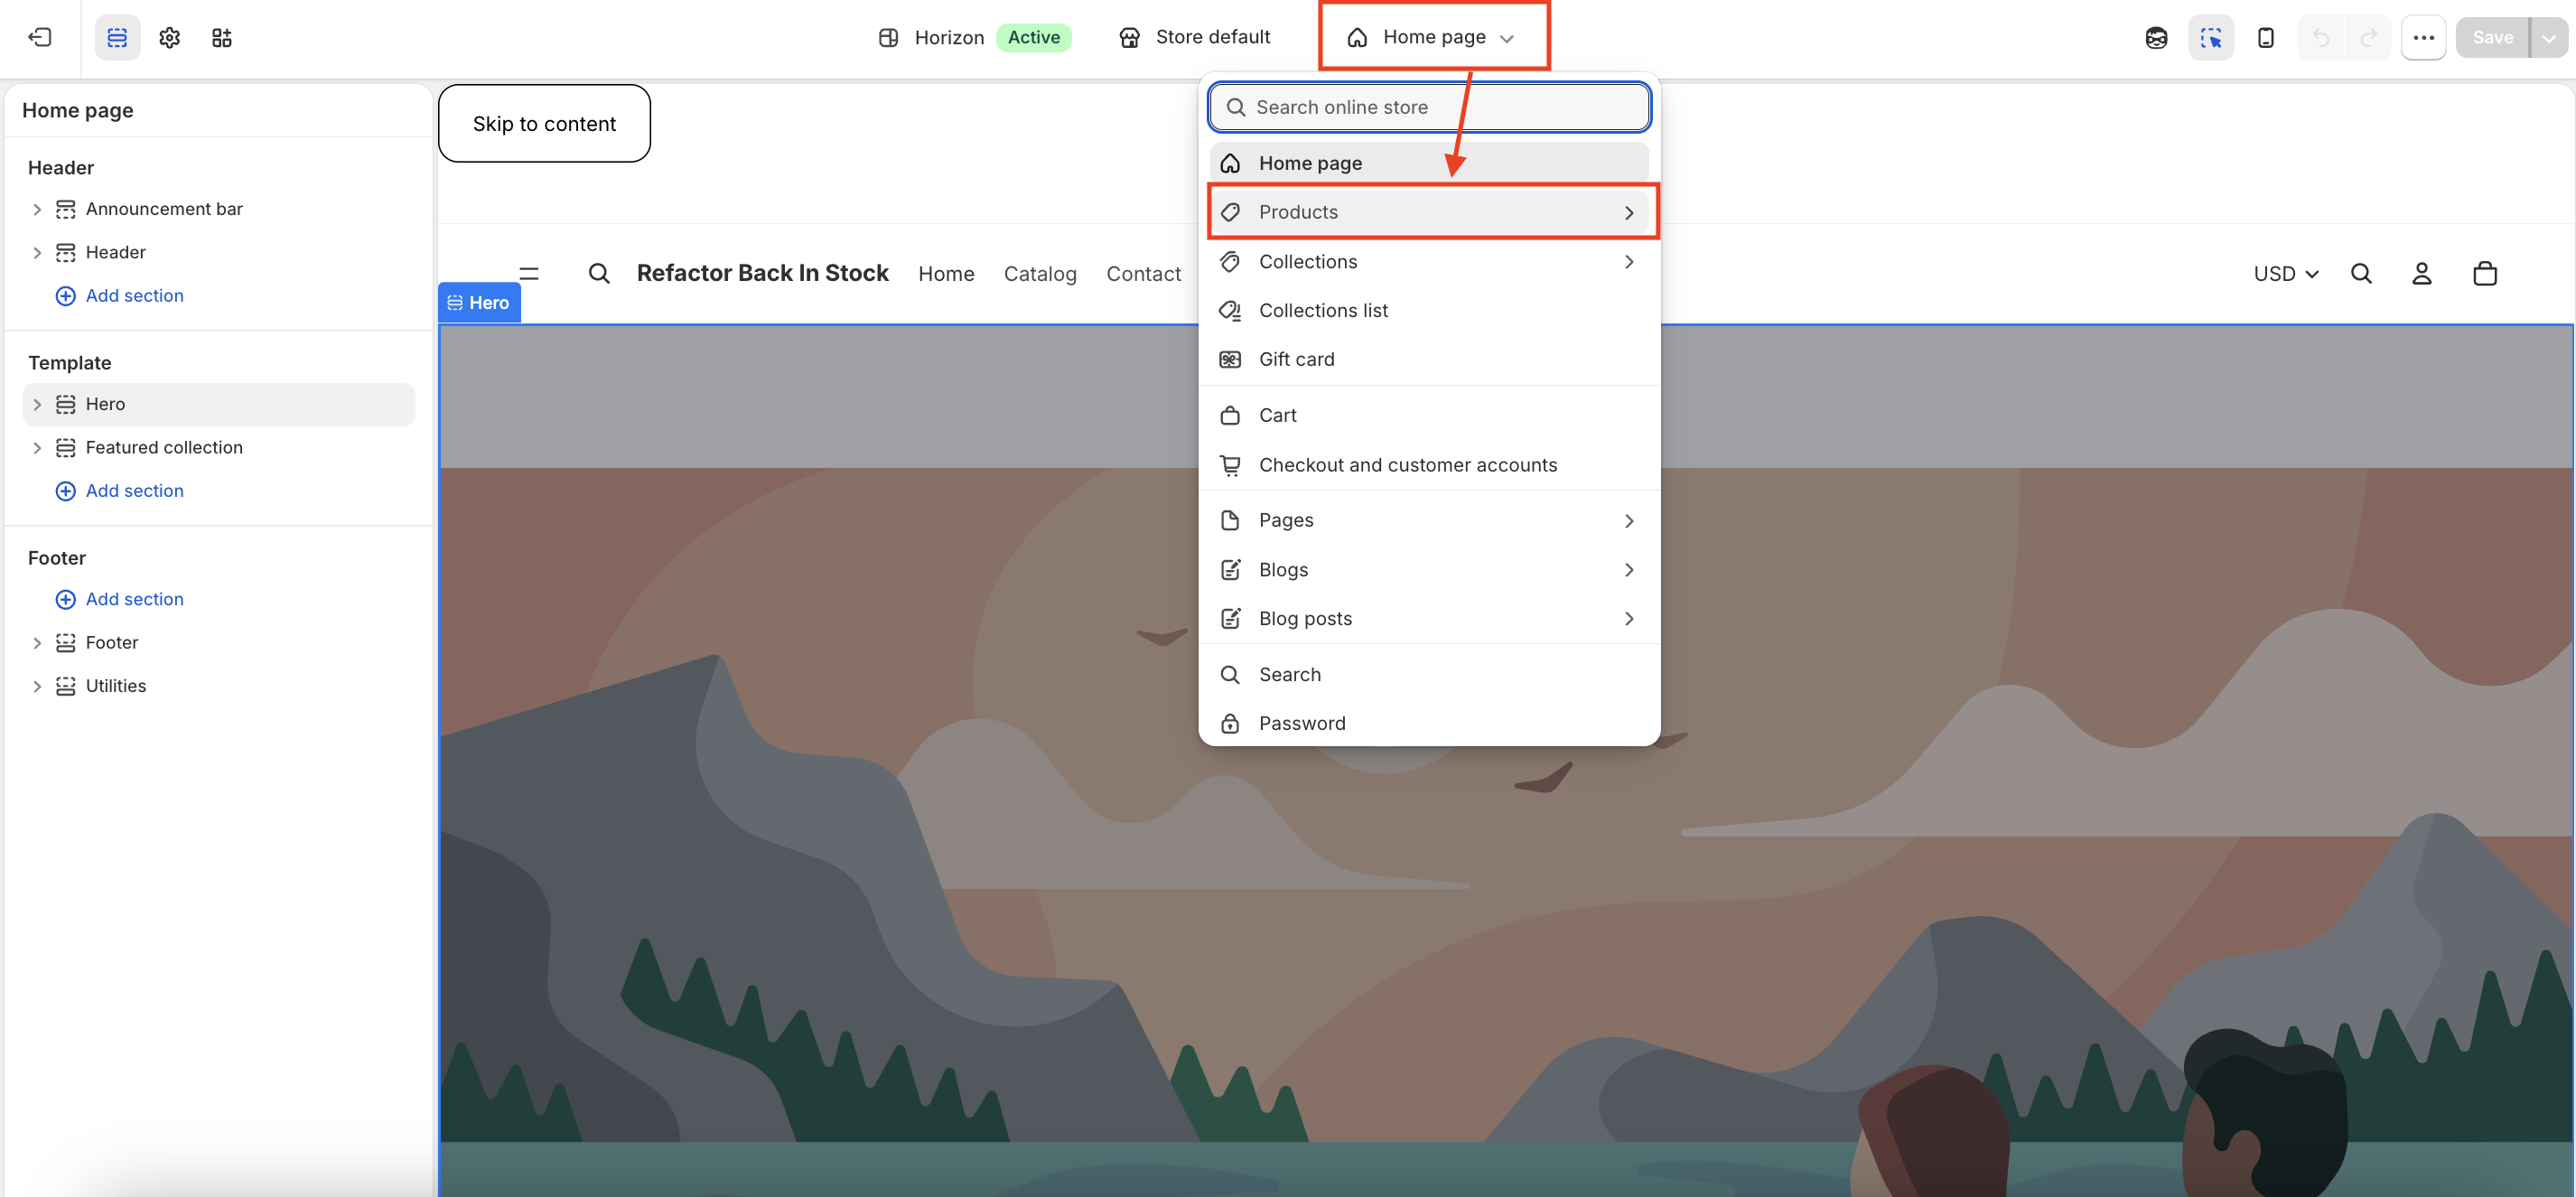
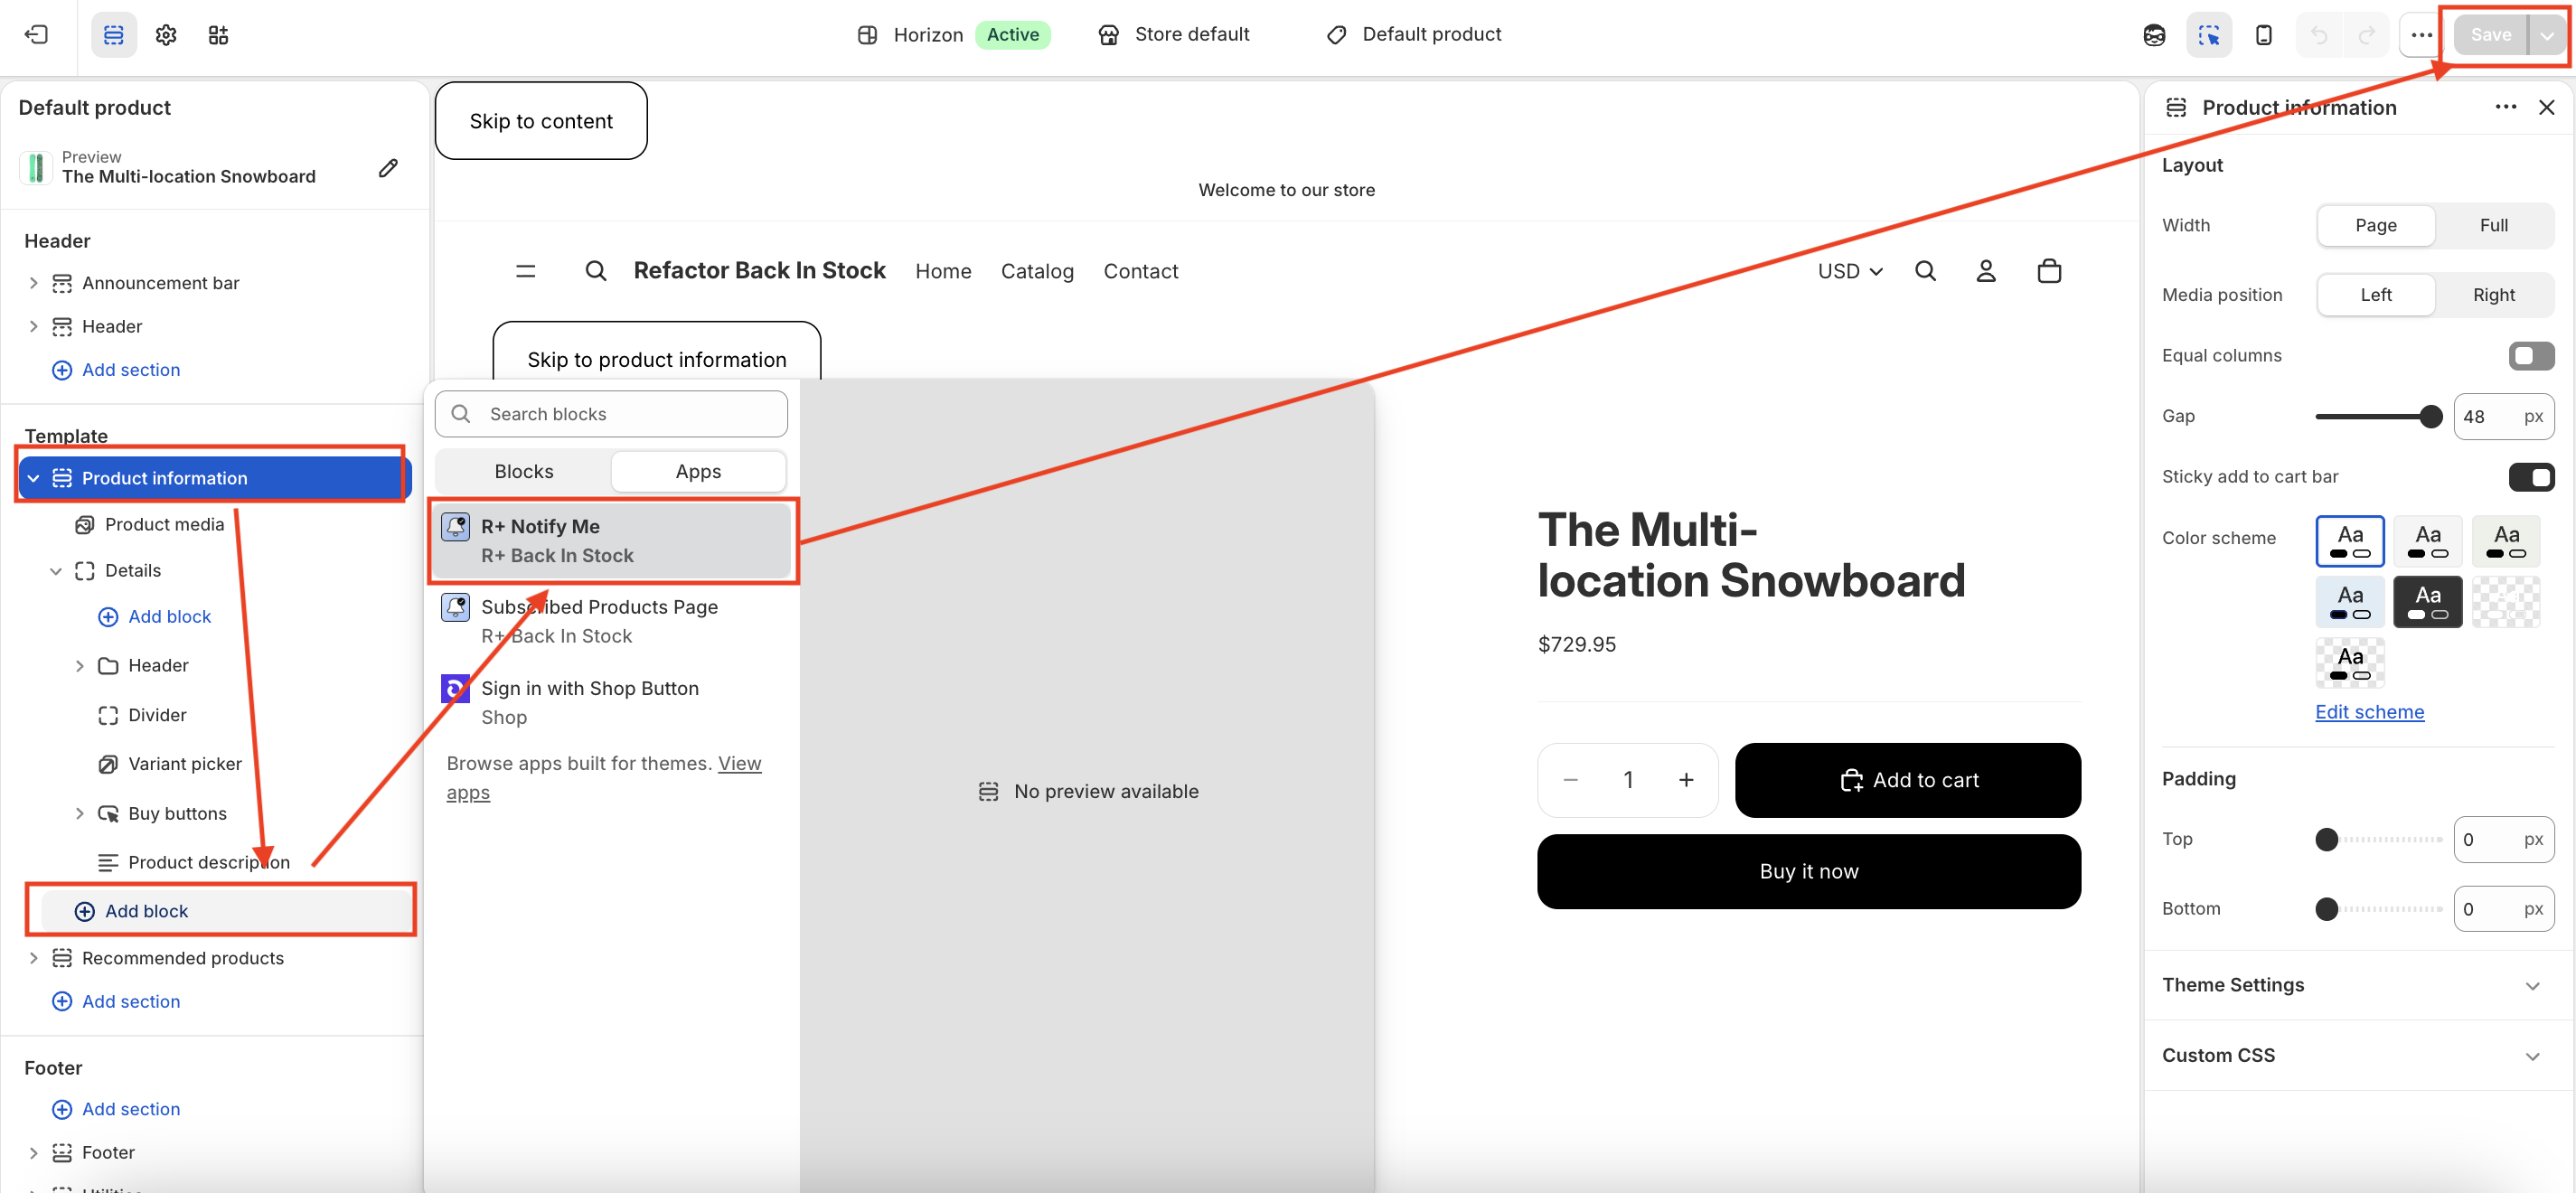
- On the Product page, open the main product section (for example, Product Information).
- Click Add block.
- In the modal window, open the Apps section and select R+ Notify Me.
- Choose the desired position of the block (above or below other blocks).
-
Click Save to apply your changes.
Adding the Floating Notify Me Button (for themes without app block support)
If your theme doesn't support app blocks, you can add the Notify Me button as a floating button that appears across your store instead.
- Go to Online Store → Themes, and click Edit theme on your active theme.
- Navigate to App embeds (the puzzle piece icon in the left sidebar).
-
Find Floating Notify Me Button and toggle it on.
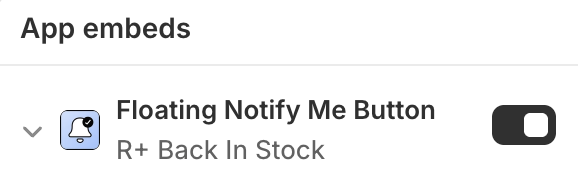
- Click Save.
Customizing the Notify Me Button (App Block)
Once the block is added, you can configure it using the settings panel on the left. The settings are grouped into several sections.
Button Settings
| Setting | Description |
|---|---|
| Button Text | The label shown on the main trigger button that opens the notification modal. Default: Notify me when available . |
| Already Subscribed Text | Text displayed on the button when a logged-in customer is already subscribed to the selected variant. Default: You are subscribed on this product . |
| Disable Already Subscribed Button | When enabled, the button becomes non-clickable for customers who are already on the waitlist, preventing duplicate subscriptions. Default: Off. |
Modal Settings
| Setting | Description |
|---|---|
| Modal Title | The heading shown at the top of the popup modal. Default: Notify me when available . |
| Modal Subtitle | A short supporting line displayed beneath the title to provide context. Accepts rich text. Default: Get notified when product back in stock. |
| Email Placeholder | The placeholder text inside the email input field. Default: Your Email . |
| Prefill Customer Email | When enabled, the email input is automatically filled with the logged-in customer's email address, reducing friction at sign-up. Default: On. |
| Show variant selector in modal | Lets customers choose product options before subscribing. Only shown for products with more than one variant. Default: On. |
| Modal Description | A small note displayed below the email field, typically used for a privacy disclaimer. Default: Your info stays private and will never be shared with anyone. |
| Subscribe Button Text | The label on the submit button inside the modal. Default: Notify me when available . |
Success Messages
| Setting | Description |
|---|---|
| Success icon | Icon shown on the confirmation screen after a successful subscription. Options: Default; Custom. Default: Default. |
| Custom success icon | Upload an image to use instead of the default checkmark icon. Visible when Success icon is Custom. |
| Success icon width | Width of the success icon. Range: 20–100%. Default: 100%. |
| Thank You Message | The header text shown in the confirmation screen after a successful subscription. Accepts rich text. Default: Thank you! |
| Button Text (Signed) | The updated label on the trigger button after a customer subscribes during the current session. Default: You're signed up! We'll notify you. |
| We Will Notify Message | A supporting line shown on the confirmation screen alongside the thank-you message. Accepts rich text. Default: We will notify you when the product is available. |
Error Messages
| Setting | Description |
|---|---|
| Error Email Text | Displayed when a customer submits an invalid or incorrectly formatted email address. Default: Your e-mail address is wrong. |
| Already subscribed error text | Displayed when a customer tries to subscribe to a variant they're already on the waitlist for. Default: You are already subscribed to this product. |
| Unexpected Error Text | A fallback message shown when something goes wrong on the server side during submission. Default: Something went wrong, reload the page and try again. |
Customizing the Floating Notify Me Button
Once enabled, click the Floating Notify Me Button embed to open its settings panel. It includes its own copy of the Modal, Success, and Error settings described above — configure them independently for the floating button — plus its own Layout, Button, and Icon settings for the floating action button itself.
Layout
| Setting | Description |
|---|---|
| Position | Corner of the screen where the floating button appears. Options: Bottom left; Bottom right; Top left; Top right. Default: Bottom right. |
| Vertical offset | Distance from the button to the nearest vertical edge of the screen. Range: 0–100px. Default: 24px. |
| Horizontal offset | Distance from the button to the nearest horizontal edge of the screen. Range: 0–100px. Default: 24px. |
Button
| Setting | Description |
|---|---|
| Size (desktop) | Size of the floating button on desktop. Range: 36–96px. Default: 56px. |
| Size (mobile) | Size of the floating button on mobile. Range: 36–88px. Default: 52px. |
| Background color | Background colour (or gradient) of the floating button. Default: #111111 . |
| Border width | Thickness of the floating button border. Range: 0–10px. Default: 0px. |
| Border radius | Corner rounding of the floating button. Range: 0–100px. Default: 100px. |
| Border color | Colour of the floating button border. Default: #111111 . Visible when Border width is greater than 0. |
| Show shadow | Shows a drop shadow on the floating button. Default: Off. |
| Shadow color | Colour of the drop shadow. Default: #000000 . Visible when Show shadow is On. |
Icon
| Setting | Description |
|---|---|
| Icon type | Icon shown on the floating button. Options: Email; Bell; Custom. Default: Email. |
| Custom icon | Upload an image to use as the floating button's icon. Visible when Icon type is Custom. |
| Icon size | Icon size on desktop. Range: 12–64px. Default: 22px. |
| Icon size (mobile) | Icon size on mobile. Range: 12–48px. Default: 20px. |
| Icon color | Colour of the built-in icon. Default: #ffffff . Not applied to custom images. |
Custom CSS
| Setting | Description |
|---|---|
| Custom CSS | Write plain CSS to apply extra styling to this floating button only — no <style> tag needed. |
Notes for Store Owners
- The block only renders when the app is not blocked at the shop level. If the block isn't appearing, check your app status in the Back In Stock app settings.
- Subscription state is tracked per variant, not per product — a customer subscribed to a Size S variant will not be shown as subscribed when they switch to Size M.
- The modal is appended to the document body on load to avoid z-index and overflow conflicts with the theme layout.
Add Translations for Your Notify Me Button App Block
To add translations:
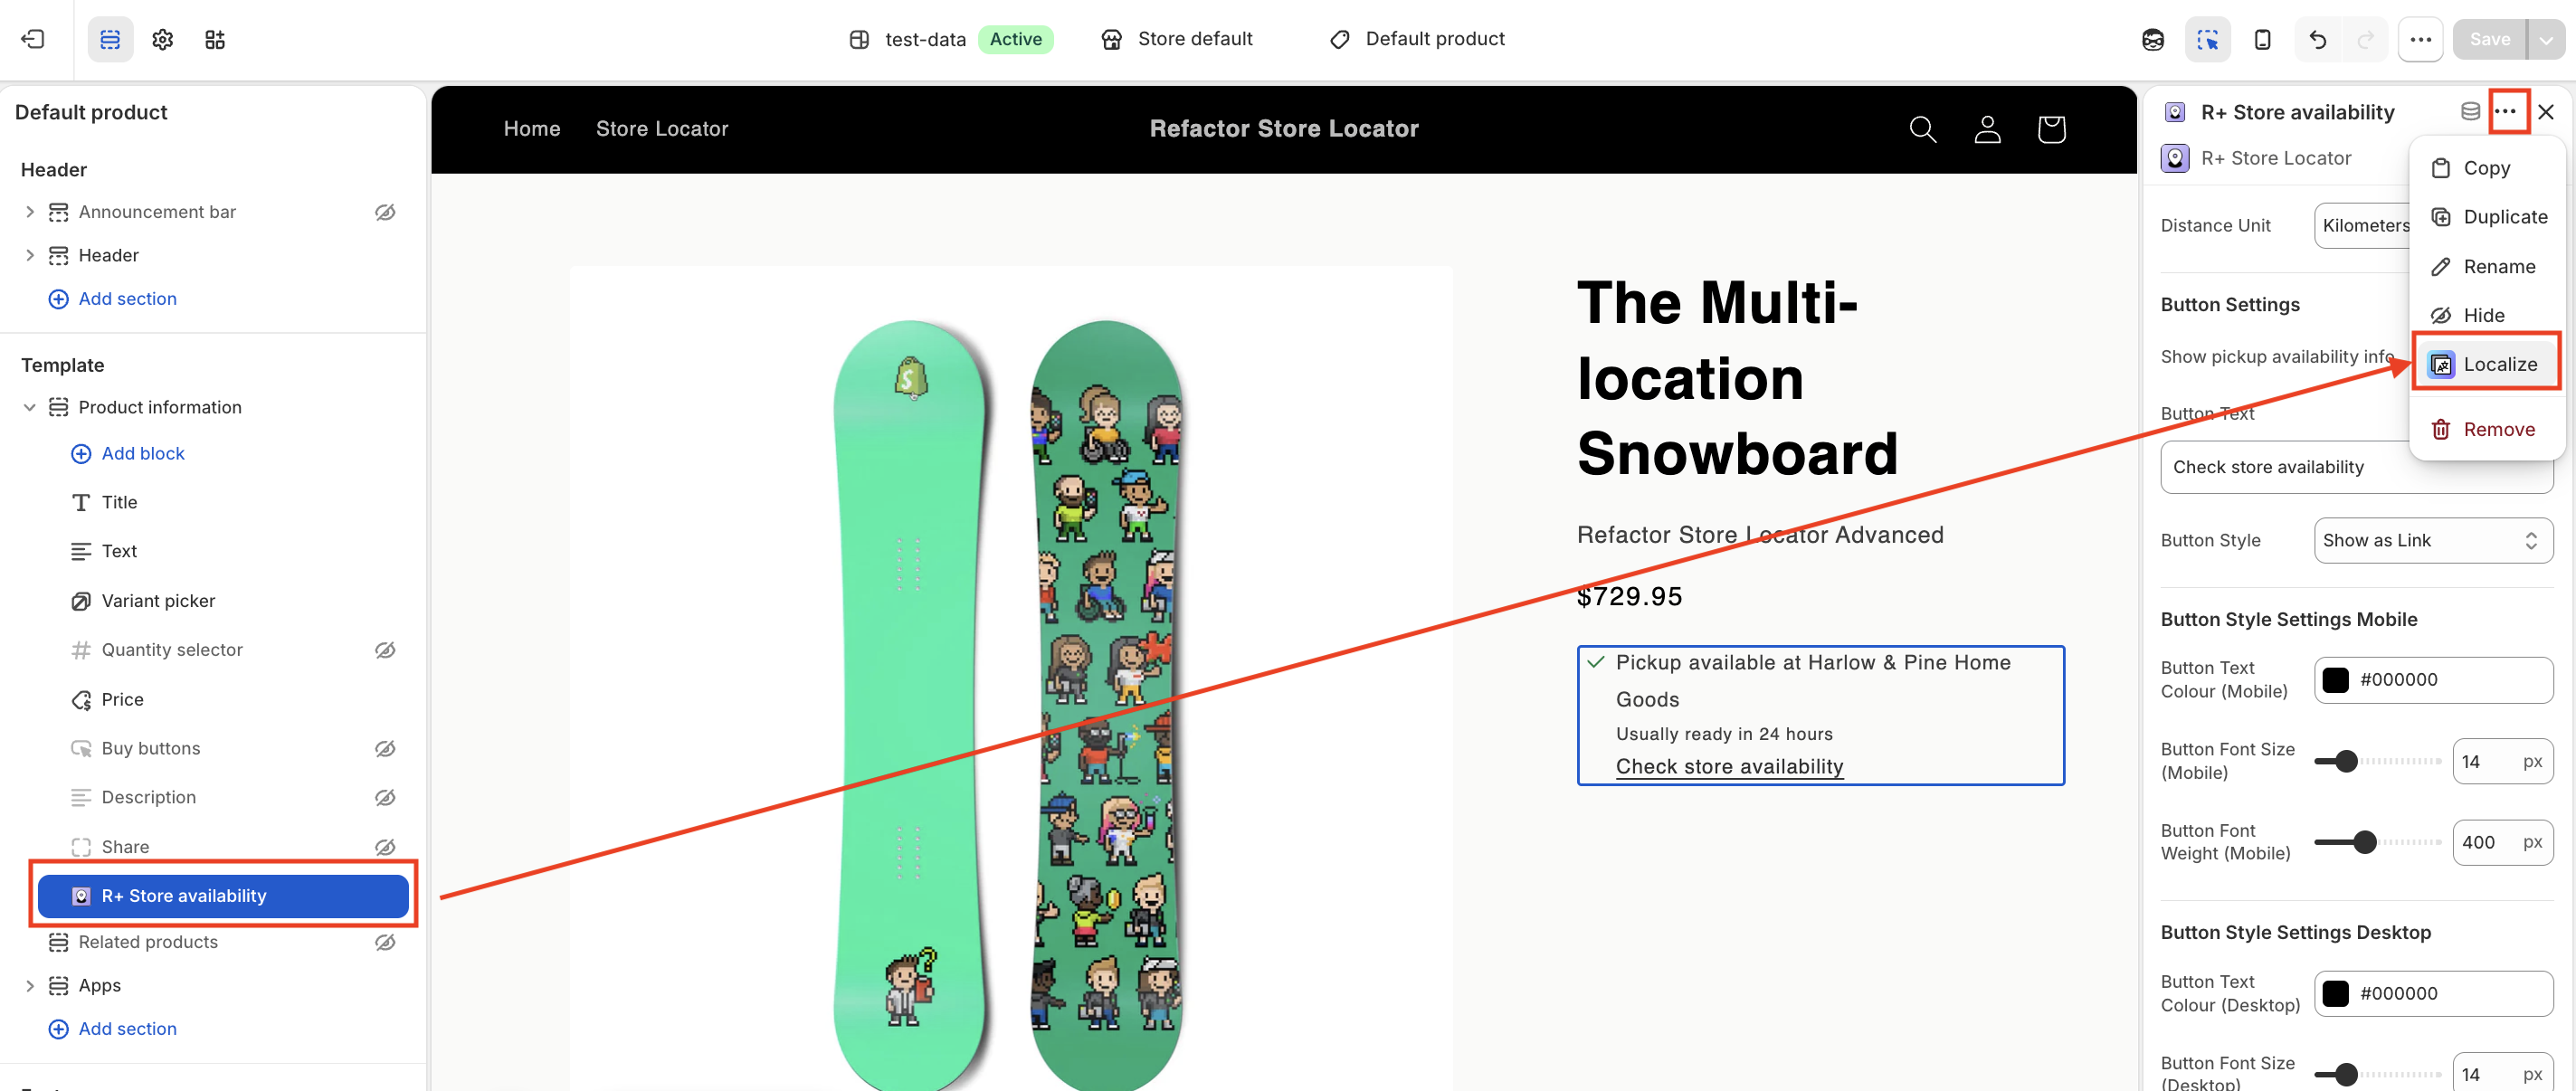
- In the theme editor, navigate to the R+ Notify Me block, then click the (...) menu at the top right corner.
-
Select Localize.
-
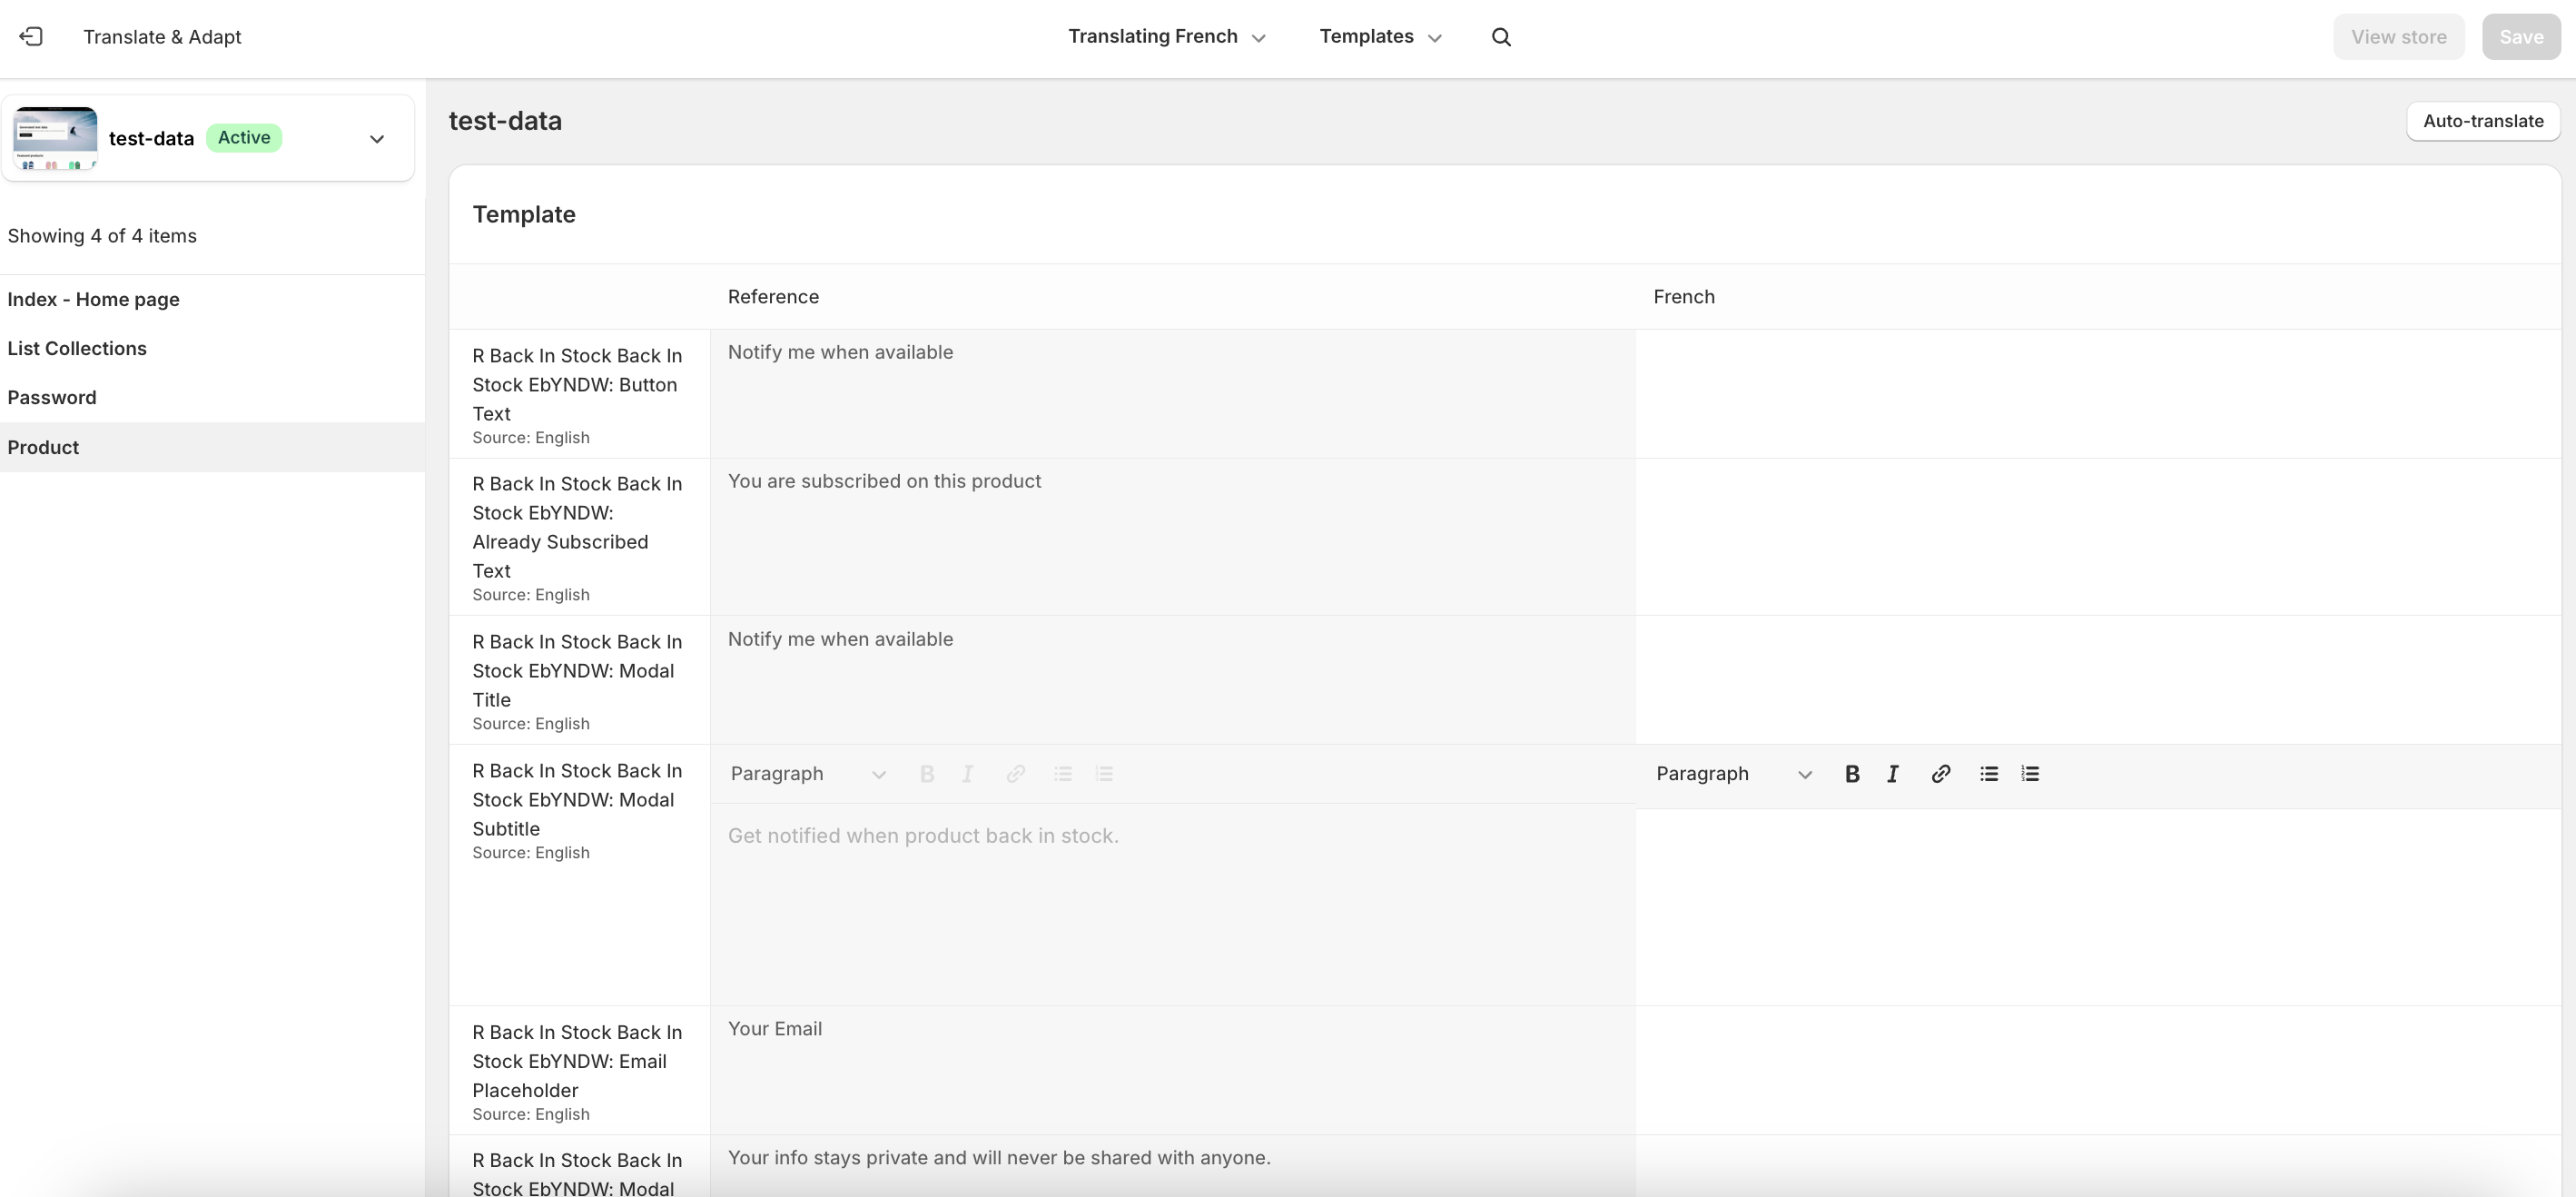
You'll be redirected to the Translate & Adapt app, where you can edit translations for the languages used in your store.
Add Translations for Your Floating Notify Me Button
To add translations:
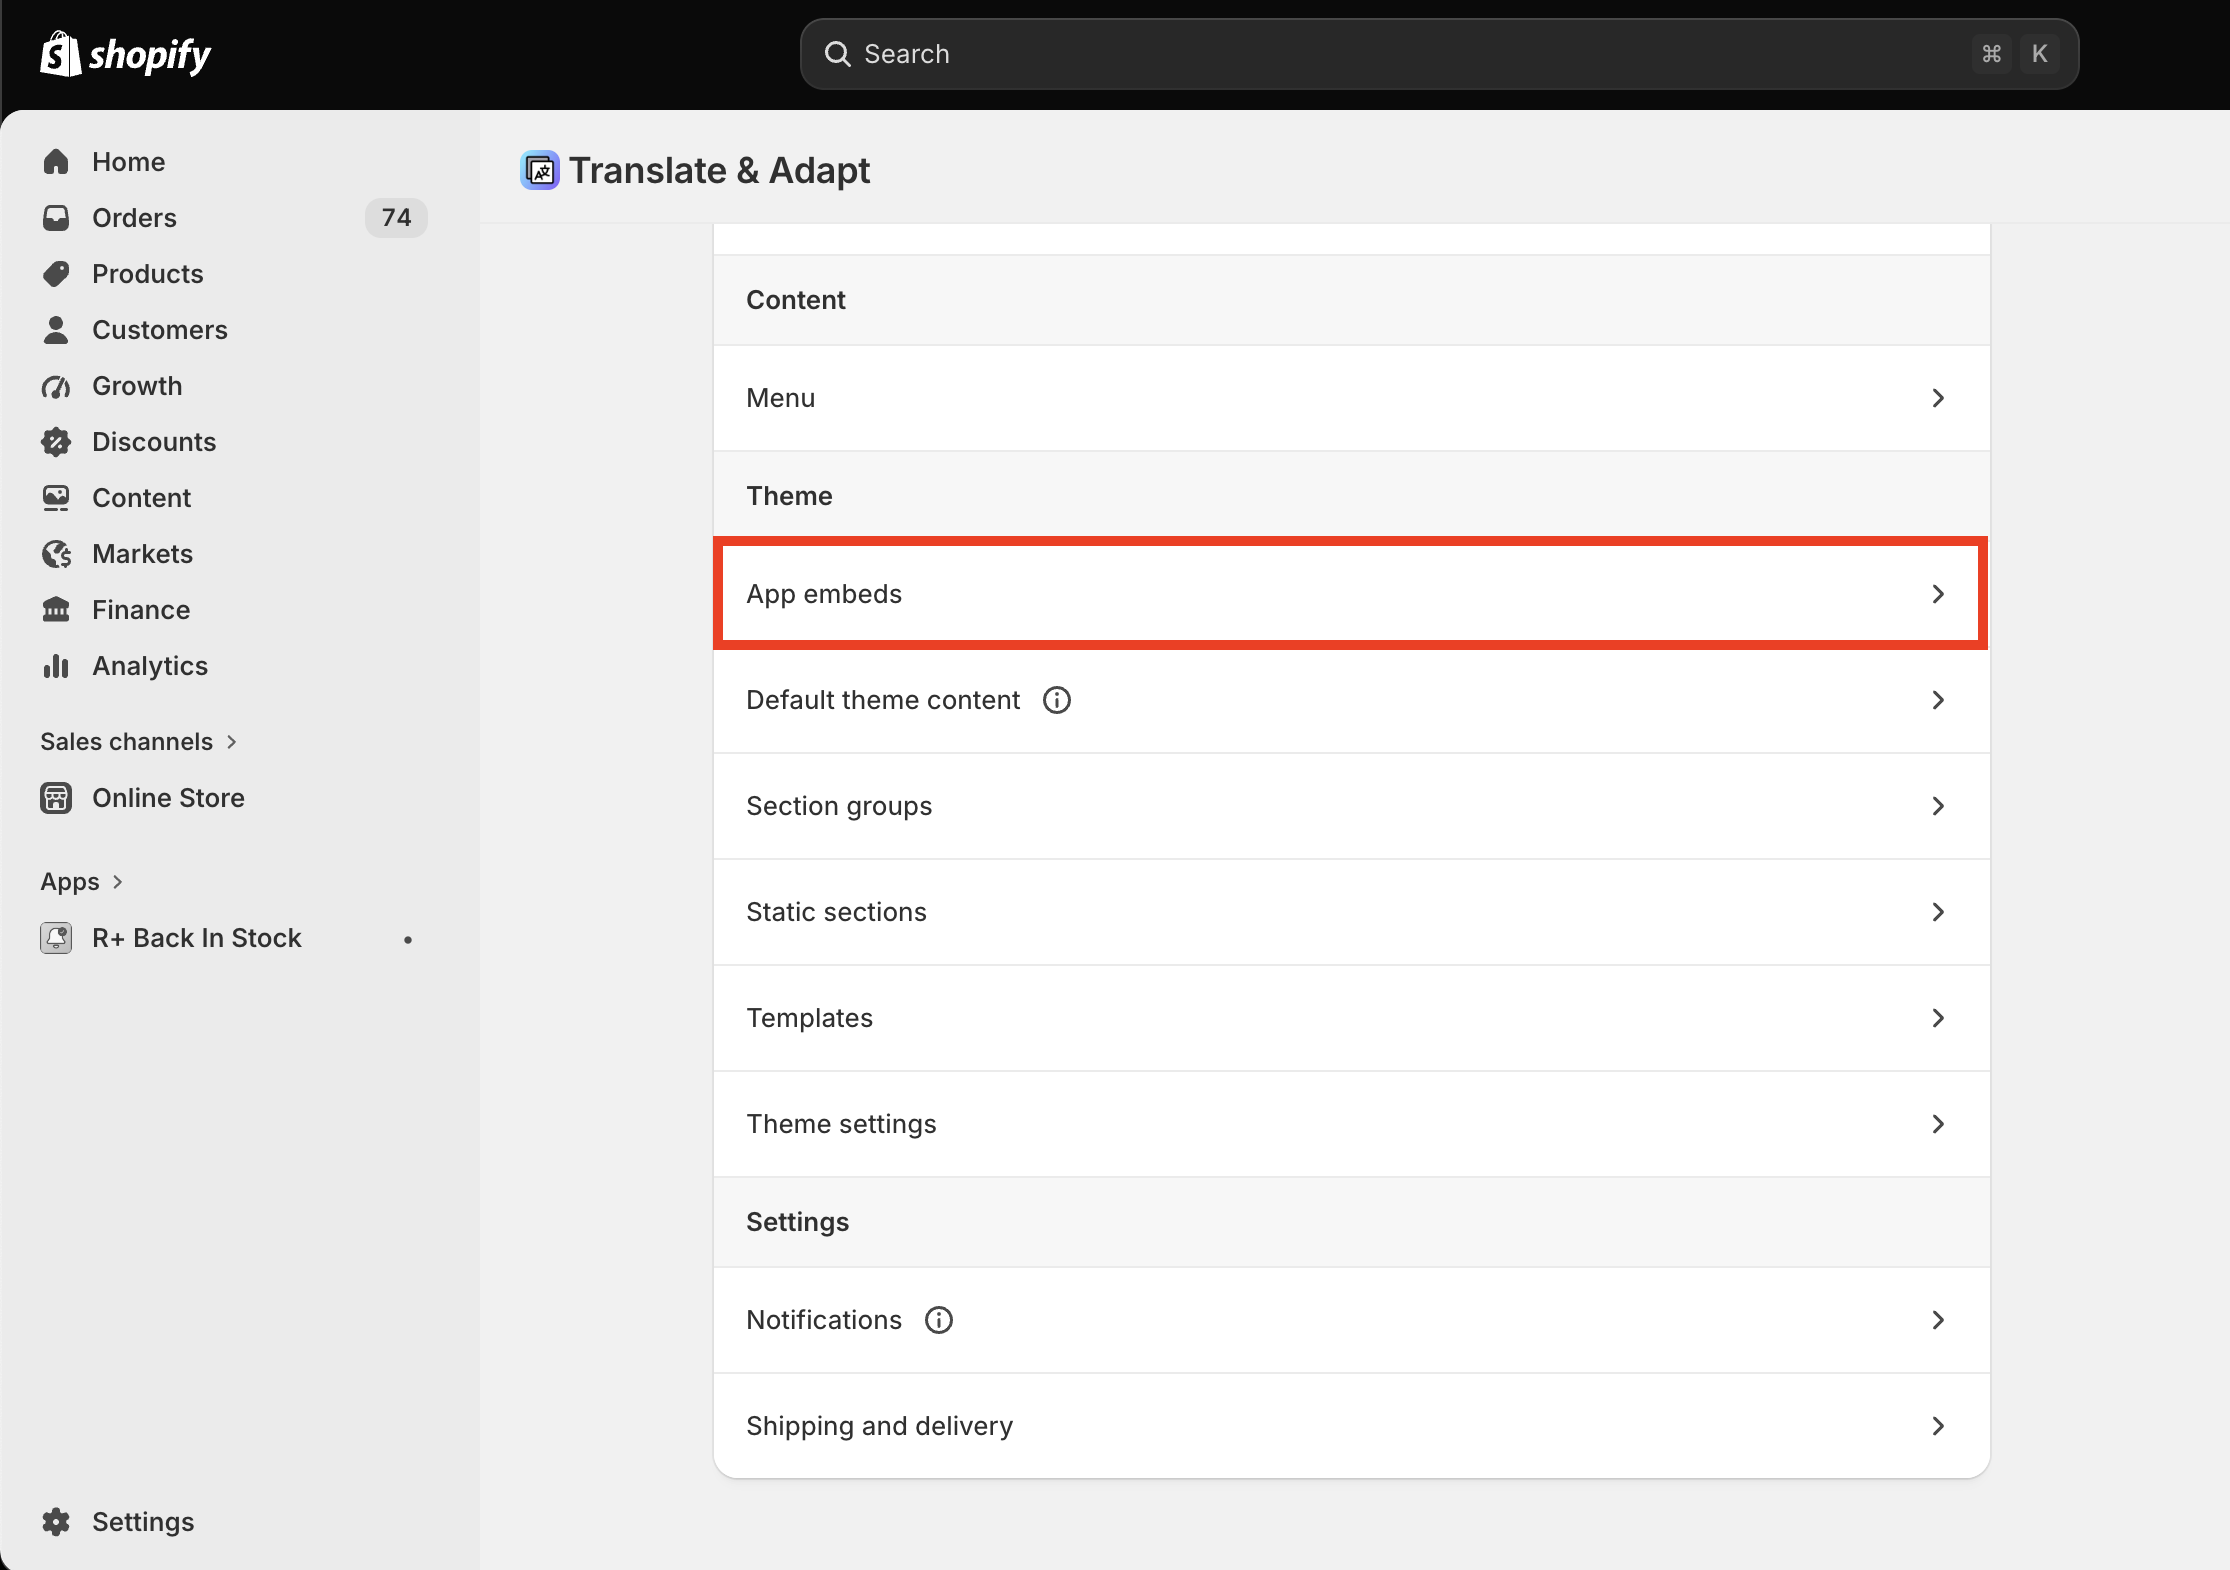
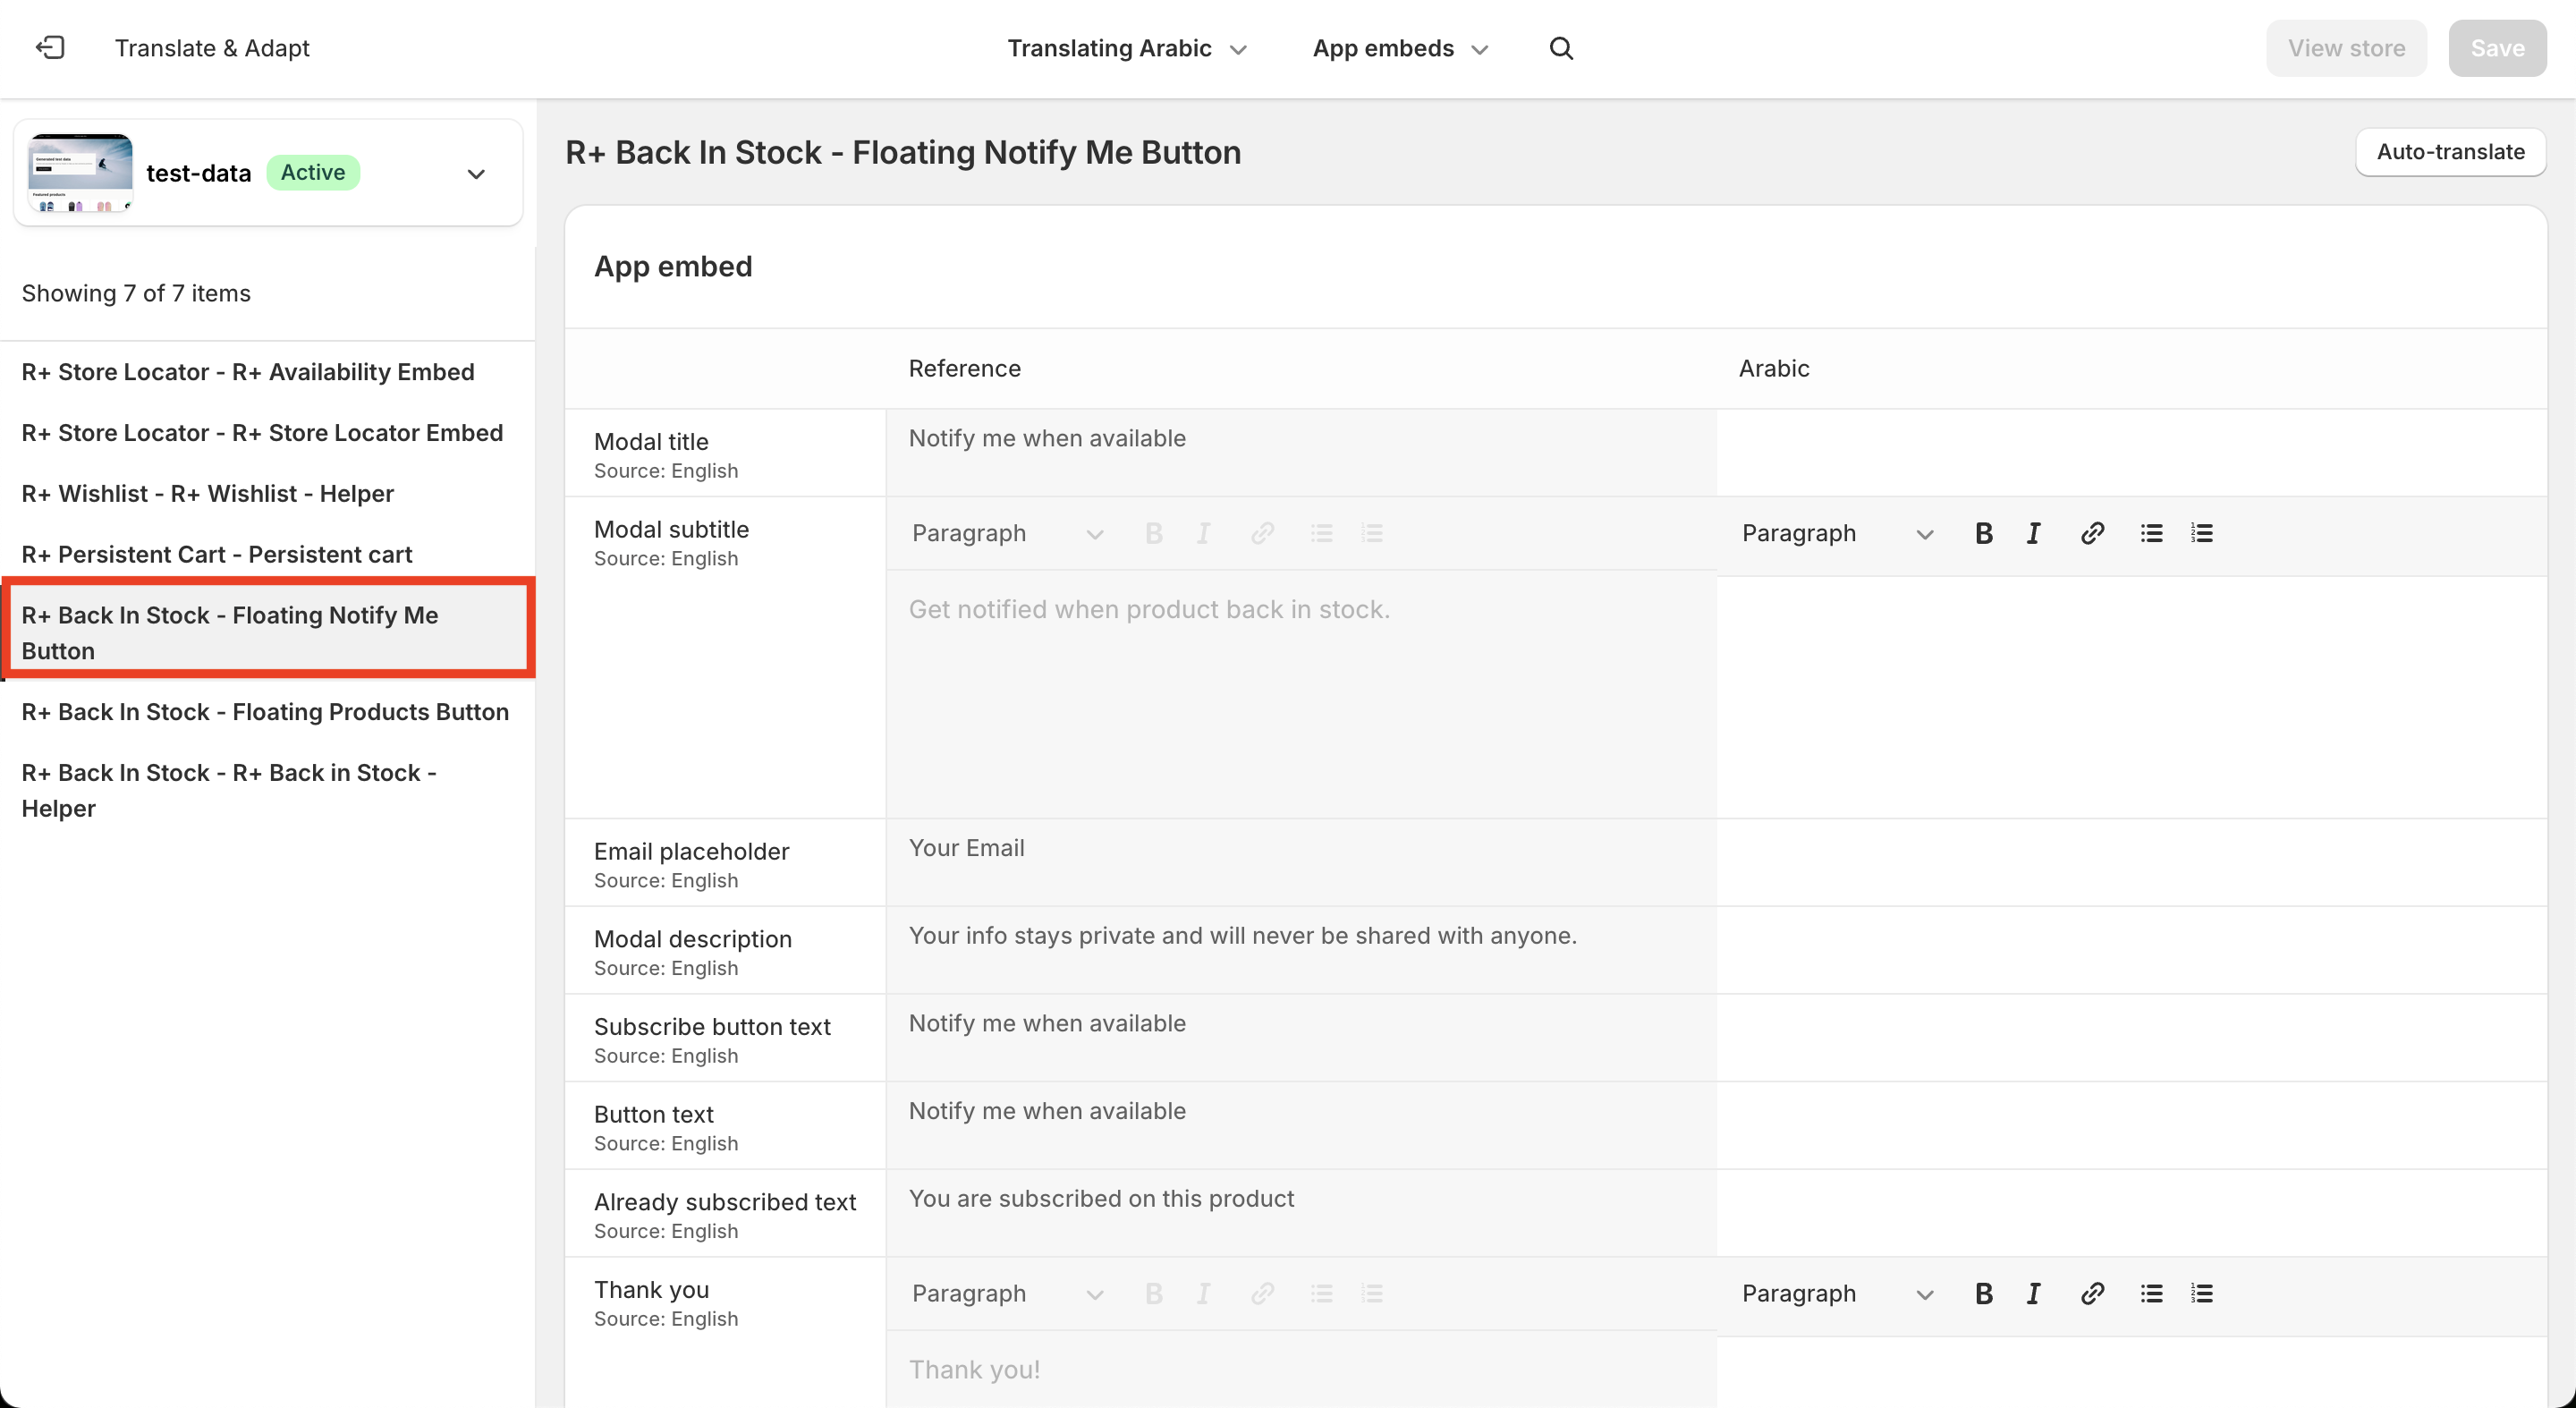
- In the admin panel, navigate to the Translate & Adapt app, then click on "App embeds".
-
You'll be redirected to the Translate & Adapt app, where you need you select R+ Back In Stock - Floating Notify me Button. Now you can edit translations for the languages used in your store.
Having trouble adding our app blocks to your store? The R+ Back In Stock development team is happy to help you get everything set up quickly and smoothly. Check this article.
Do you need help?
If you have any questions or run into issues, please contact us — we’re happy to help.